Saturday, July 28, 2012

Retrospective #14: Low Cost / High Performance Window Insulation


In one of last week’s photos of my 1782 farmhouse in the States was a window quilt made from a quilted mattress protector. I picked it up, along with a dozen or so others, at various rummage sales. A rummage sale is an op shop on steroids.  Church groups, school groups or scouting groups may sponsor a rummage sale once or twice a year.

The sales fill large gymnasiums and last an entire weekend. But by Sunday afternoon, everything must go! That is when the fill-a-bag-for-$2-sale is on. That’s the time to get old bed sheets to use as painting drop cloths, or quilted mattress protectors to insulate windows. While I have yet to hear about a rummage sale in Wanganui, I am known to frequent op shops about town.


Last year while in one fine establishment looking for a quilted mattress protector, I ran across a shelf of wool blankets at $3 each. My wife will tell you I have a fetish for wool blankets, but I will argue it is a fetish for any high quality product made of high quality materials. I also have a fetish for warm homes and low power bills. I am happy to report that our power bill for June was $20.67.


Which reminds me, one of the best ways to cut a power bill by 10% or 20% is to take advantage of the discount for prompt payment. For the average New Zealand home, that means a discount of $25 - $50 each month. One way I make sure I remember to pay early is to walk from the mailbox straight to the computer and pay online. Done and dusted.


All this is a long way round to today’s topic – back by popular demand – window battens, or as a more practical person has recently called them, window blankets. I wrote about this Yankee/Kiwi hybrid of a window quilt over a month ago and people are still telling me they use them and have noticed a difference in warmth retention. That’s awesome…for them. But winter is only half over and others may not have seen that article.


Single-pane windows are one of the biggest sources of heat loss in a home. For those who cannot afford double-glazing or thermal curtains, this is the lowest cost / highest performance option. A tight-fitting window blanket offers the performance of double-glazing or of the best thermal curtains at a small fraction of the cost. I am “trialing” a number of variations.


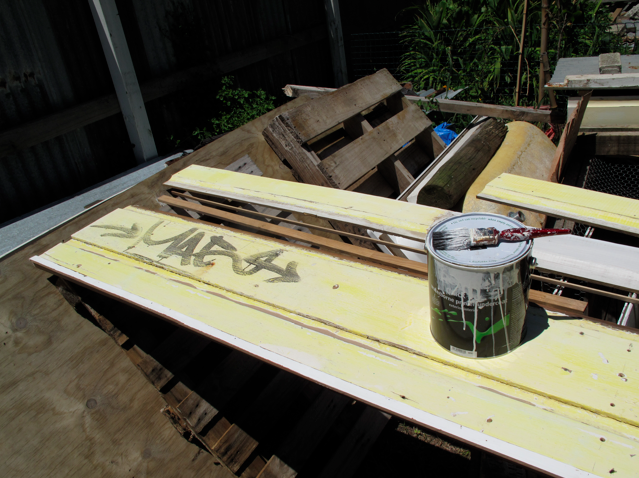
The prototype I wrote about consists of a blanket “sandwiched” between two long, thin pieces of wood (25 mm X 25 mm, and 25 mm X 5 mm) fixed together with short screws. As you can see from the pictures, the wood is wedged at the top of the window frame and the blanket is held in place by gravity. It takes 10 to 15 seconds to take down, role up and put away in the morning, and about the same to put back up in the evening.


Another variation I’m using consists of a wool blanket draped over a single piece of wood measuring 10 mm by 50 mm. The board is wedged at the top of the window frame and the blanket falls front and back. This version is easier to make, but does not suit daily removal and replacement because it takes a while to square up the blanket. We use this version in some south-facing windows where we plan to leave them for the next two months.

At this time of year, only northerly-facing windows receive the heating provided by direct sunlight during the day. But at night they lose heat just as southerly windows do. Thus the removable window blankets described above.

Peace, Estwing

Friday, July 20, 2012

Retrospective #13: Lessons from a Long Dead Patriot


One of the few things that my villa in Castlecliff has in common with my farmhouse in New Hampshire (USA) is that the Jehovah’s Witnesses always know how to find where I live. Now, this may not seem like a great accomplishment of geo-location on their part, but the location of my farm practically defined the wop wops.

Trollbakken – as it was named by the previous Norwegian owners – is two miles off a rural highway, one mile beyond where the pavement ends, ½ mile after the last power pole, and 1/3 mile past where the snowplows turn around during the five months of winter. In other words, it is heaven on Earth. How I came to trade that paradise for my current one here in Wanganui is a story for another day.


The farmhouse was built in 1782 by Mark Batchelder, and although he died over 200 years ago, he has been a great teacher for me. You see, long before the term ‘passive solar design’ was coined, Batchelder, and other sons of the American Revolution, were building with the sun in mind. For example, Trollbakken sits on the southeast slope of Ragged Mountain where it catches the first rays of winter, morning sun and is protected from cold northwesterly winds. (Remember, that is the Northern Hemisphere.)


As a traditional “cape cod,” it has a massive center chimney (with three fireplaces) that serves as thermal mass at the heart of the dwelling. Once warm, the chimney would hold that warmth for long periods after the wood fires had gone out.

Taking what I learned from Batchelder, I looked for a house in Wanganui that was sheltered from the prevailing winds and would get good morning sun. Additionally, we installed our wood burner along an interior rather than exterior wall of our villa.

Neither home was insulated when I purchased them, so that was a priority in both cases. Because of the historic nature of the Batchelder home, the renovations were limited to insulating the attic, replacing rotted wood in a few places, and exposing the original hand-hewn chestnut post and beam frame.


The last of these three started as an innocent idea to remove some ugly wallpaper. Under the ugly wallpaper was more ugly wallpaper. Under that was cracked horse hair plaster and split wood lathe that Dani and I decided to remove. And under that was a hidden treasure: 20 inch wide vertical boards and the 8 inch by 8 inch hand hewn posts.


An afternoon project turned into a two-week project that included pulling hundreds of small nails that held on the lathe, caulking lots of small holes, painting and installing a crown molding. At the same time I replaced the two windows on that wall with new double-glazed windows (the frames are made from vinyl, not aluminium, in the States).


In the ‘after’ picture, you can see a window quilt on the left. As these were north-facing windows that received no direct sunlight in winter, I fixed that window quilt with thumbtacks and left it up for five months. The other window had a removable window quilt so we could look out and see the moose, deer, and coyotes out the back. (The black bears were hibernating.)

Renovating a 220-year-old structure is a slow and cautious process. But as a farmer with five months of snow cover, I had plenty of time to dedicate to it. No phone. No TV. No internet. Not even the Jehovah’s Witnesses were willing to make the 1/3 mile journey through thigh-deep snow between December and April. (But like the black bears, they would return in spring.) Nothing much to do but learn lessons from the ghost of Mark Batchelder. Those lessons have served me well.

Tuesday, July 17, 2012

Retrospective #12: Mud Room Cont...


This is part two of the new mini-series gripping Wanganui audiences: The Eco-Thrifty Mud Room. If you missed last week's episode, I wrote about covering the gaps between our floorboards, Bruce Springsteen, and a hybrid Kiwi/Yankee version of a storm door. While that column fell short of a Pulitzer, hopefully it inspired some readers to think outside the square when it comes to low-budget/high performance approaches to warm, dry, healthy homes.

This week's column remains inside the square, or rather inside the pelmet. You may recall that I like pelmets almost as much as I like Neil Diamond. You may also recall that pelmets are important for preventing warm air that has collected on the ceiling from being “pulled” down against cold windows and creating a convection current that will cool and entire room – even a small mud room.

I have noticed in some homes around Wanganui a pelmet over the front door with a curtain that can be drawn when appropriate to add an extra layer of insulation. I decided to do this in our mudroom even though we already had two doors providing a level of protection against the cold by creating an air gap between them.


As with the pelmets elsewhere in our home, I made this one out of weatherboards removed while re-cladding the exterior. I inverted the weatherboards so that the scallop faces down. This makes an attractive detail on all of our pelmets.

As you can see from the photo, this very special weatherboard has been signed by a local artist!


While the paint was drying on our new pelmet, I used some off-cuts of framing timber to make a framework to hold it. While all of our other pelmets are just 150 wide mm, I made this one about 400 mm wide so that it would reach from the ceiling to just above the door, just covering the second-hand curtain rail and the top of the second-hand curtain.


I hung the curtain rod so that the curtain would not quite touch the floor of the mud room that could, on occasion, be muddy. To make up the space between the bottom of the curtain and the floor, I wrapped a "two-by-two" (45 mm x 45 mm) in an old towel to make a “draft blocker” – described in a column a few weeks ago. If the towel gets wet or dirty it can be thrown in the laundry easier than the curtain could. The draft blocker also holds the bottom of the curtain against the door for a nice, snug fit.

To summarize, the story of the mud room is one of romance, intrigue, solar gain, insulation, draft-proofing and creative reuse. The reuse of doors, hardboard, weatherboards, curtain rails, curtains and off-cuts of framing timber in this small Eco-Thrifty case study are just a few of the many examples of creative reuse and repurposing that we embraced during our project. In future columns I'll document more of the ways we have turned trash into treasures in our little house that could.


Peace, Estwing


Friday, July 13, 2012

Retrospective #11: The Mud Room


This week and next  I'll wrap up the discussion of how to make a home warm, dry, healthy and energy-efficient on a budget with a small-scale case study of our "mud room." In the process of shifting the kitchen, bath, toilet and laundry around the lean-to section of our villa, we created a small room at the existing back door. The room measures roughly two metres by two metres, with a hot water cupboard taking up about one quarter. Both the door and the floor were anything but weather-tight.

 Before: Smashed glass in back door.

 Before: Natural ventilation.

As a mud room - where you take off your boots when entering a home - I decided that we ought to put vinyl on the floor. My wife disagreed, so I waited until she went away for the weekend and then put down the vinyl. But first I had to level out the floor, which was cupped and split. We had some painted hardboard formerly known as the kitchen ceiling in various hues of white and neon green. I reused the hardboard to cover the gaps and level the floor, and then laid the vinyl end-of-role that I bought at a great low price from a local flooring shop that sells small pieces for small jobs. This took care of the draft coming through the floor, and sometime soon I'll get around to installing the under-floor insulation. The next element to tackle was the bruised and broken door.

A ceiling becomes a floor.

My approach to replacing the door was to do it twice. That is with two doors. In most parts of North America two doors are better than one. The second (outer) door comes in two flavors: screen and storm. A screen door features in the opening line of one of the greatest rock n' roll songs ever written: Bruce Springsteen's Thunder Road. 

The screen door slams; 
Mary's dress sways; 
Like a vision she dances across the porch; 
As the radio plays.

A storm door is neither as lyrical nor as romantic. Screen doors conger images of summer and pretty girls in sun dresses. Storm doors conger images of…storms. But we get storms in Wanganui, and our back door is to the prevailing winds. 

After: Two new doors.

I bought two second-hand doors: one from an online auction ($40) and one from a local building materials reseller ($100). I hung the dearer four-pane rimu door on the inside to replace the one that had been smashed, and hung the cheaper two-pane door on the outside to serve as the storm door, being careful to flash the top to keep out blowing rain. I attached draft excluders to the bottom of both doors and installed foam window and door seal around the frame of the inner door. 

After: Two new doors.

For a total under $300 I was able to seal up all of the air gaps, put in a new floor and achieve a version of eco-thrifty double-glazing, which lets sunlight in to warm our home but also insulates against heat escaping. But that's not all, I'll continue this story next week. 

Peace, Estwing

Thursday, July 5, 2012

Eco, Thrifty, Prepared

For those in attendance at the Josephite Retreat Centre on Sunday for Guy McPherson's presentation, the information he shared on climate change was sobering. Although I have been studying and teaching about "global warming" for over 25 years, I was still shocked by some of the latest research in the field. 

Personally, I "checked out" of the climate debate after the failed Copenhagen Climate Change Conference in December, 2009. Since then, the conversation internationally has shifted from prevention to adaption. In other words, governments worldwide have essentially admitted there is no chance of reducing greenhouse gas emissions below dangerous levels and instead we need to brace ourselves for the fallout. 

Fallout, in most cases, comes in the form of rising sea levels and an increase in the number and severity of extreme weather events. In response to sea level rise, Venice, Italy is spending up to a billion dollars on giant flood gates that are hoped to hold back storm surges. In the U.S. state of North Carolina, the legislature is fighting a rising sea level by passing a bill forbidding state agencies from reporting that sea level rise is accelerating. (This is not a joke.)

Regarding protection against extreme weather events, it appears to be more of an everyone-for-themselves response. Large-scale responses - such as the Horizons' proposal for the Whanganui River - are likely to be rejected by the majority of rates payers. Tax increases anywhere in the world appear to be universally despised. That leaves protecting oneself and one's family to…one.

For us, many of our efforts at climate change adaption also reduce our carbon footprint and vice versa. At the same time, many of these efforts also protect us from disruption of services due to a major earthquake or power failure for any reason. For instance, we have seven ways to cook only one of which requires electricity. During the power outage in March, for instance, we baked three loaves of bread and cooked a huge pot of soup on our good old Shacklock 501.


We regularly use our solar cooker for everything from potatoes to cheeseburgers.


We also enjoy cooking outdoors in our pizza oven or on the BBQ (both wood-fired). 

In case of an extended drought and water restrictions, we have a 500 litre tank to collect roof runoff. To protect against high winds damaging our fruit trees and vegetable gardens we have wind netting, in some cases two layers.

Guy advocates four approaches to resilience: access to food; access to clean water; provision for maintaining body temperature; and, building community. We have established all of these from scratch during the last year and a half. This blog has demonstrated how we did it all on a tight budget. 

By designing and building a low-energy, resilient home and section, we are fulfilling a version of the cliche' saying: "Live your life like you will live for a hundred years, and as if you'll die tomorrow." In our case it is in response to climate change: Live your life like you want to prevent climate change, and as if you'll get a record setting storm tomorrow. 

 Peace, Estwing